Member Rosters
Q: How do I Export a Member Roster?
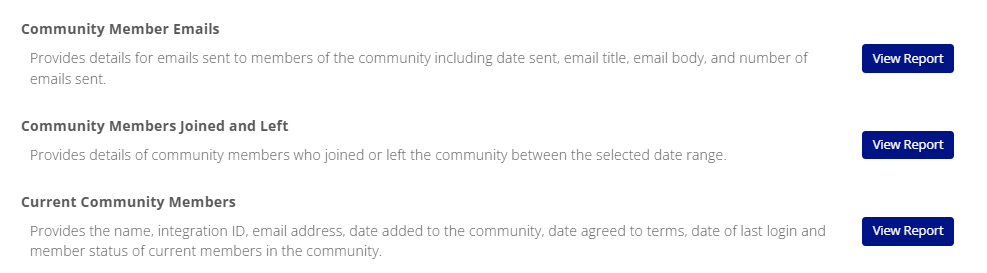
A: (1) Click on "Settings" within the chosen community, (2) click "Reports", and then select "View Report" for "Current Community Members". (3) You will choose what file format to have the report sent to you as. (4) Check your email and you will receive a Hyperlink which will open a browser tab and download the report within your browser webpage. Below are the three different Member Rosters that you can export.
Managing Events
Q: How Do I Create an Event?
A: (1) In your chosen Community, navigate to the Events Tab and Click Add Event. You will have to choose an Event Type (See Event Type descriptions below.)
- If your Chapter or Industry Group is hosting an Online meeting without registration, you can choose Member Training, Webinar, or Chapter Meeting. Here you will be able to add a link to the chapter training as well as a description and contact information for the event. You can also include an image. This option can also be used for events with separate registration and landing page.
- If you would like to create an event with registration, but no charges, choose RSVP Only. RSVP Event type has options to send members emails of confirmations for their registration. We recommend enabling Event Registration Confirmations to be sent out, and for the rest of the options, you can keep them marked as "Do Not Send".
| Event Type Name |
Description |
| **Full |
Use this for large, multi-day events, like annual conferences, etc., where you plan to host an agenda full of sessions and other registrations add-ons (e.g., keynotes, lunches, and after-hours events). This event type supports the most complex events, including multiple member-recognized registration rates and the purchase of unlimited other options. Multiple sessions/tracks are supported. One user can pay for and register multiple attendees. |
| **RSVP Only - no payment |
This option is for events where formal registration (or payment) isn't required but users still must acknowledge their attendance by RSVP. This allows an attendee roster to be tracked. Webinars, fun-runs, and various work functions are the types of events this process is often used for. Note that only users with accounts on your site can RSVP. |
| **Simple |
Registration is included and can do one price for all registrants or Member/Non-Member pricings along with early bird pricing and/or late pricing. Use this for smaller events where registration is desired but sessions and registration add-ons aren't needed. Generally, member/non-member pricing is used for this type of registration, but more complex pricing can be set up, if needed. |
| Chapter Meeting - $ |
This event type allows for member and non-member registration pricing and early bird/regular/late pricing. |
| Chapter Meeting- No Registration |
This event type does not involve any registration. This is used to create an event posting with details to display in your community's Events tab. |
Q: How Do I Edit an Event?
A: To manage your events: go to Settings (Located next to the Community Header) and click "Manage Events" Under the Events section. Here you can view your registration list and you can edit the event listing. Under the "Actions" Column on the right side, click Edit to make changes to the event details. 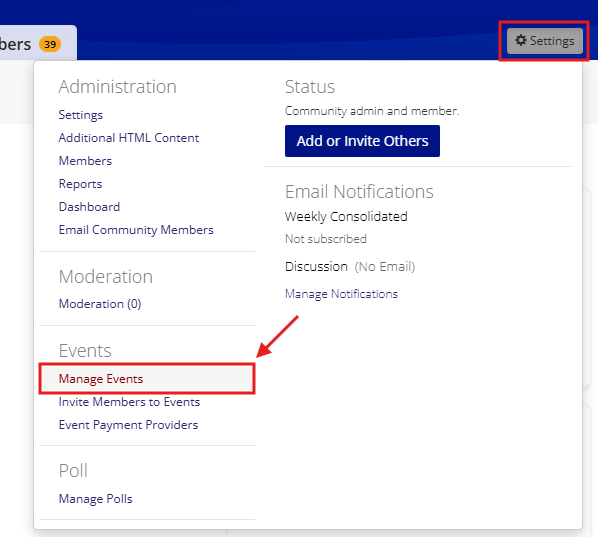
To edit the event pricing, or to cancel or put the event on hold, click the dropdown menu on the Edit button and select the option you need. Special Pricing is used for exceptions if an unpaid registrant is to be assigned a different pricing category. You will select a registrant and then select the pricing to change to.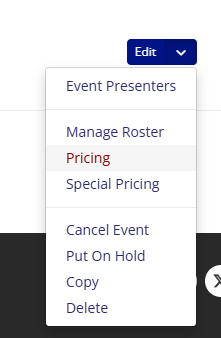
Q: How Do I Export a Registration List?
A: (1) Go to Settings (Located next to the Community Header) and click "Manage Events" Under the Events section. (2) Under the "Registrant" column in the middle, you may click on any of the hyperlinked registrant numbers to access the registration list. (3) On the right side of the screen under the Event Attendance Summary box, you will see an "Add Attendee" Button with a dropdown button. Click on the dropdown and select "Export." The export will be downloaded within your browser.
Library Folders & Entries
Q: How Do I Create Library Folders ?
A: (1) Navigate to the Library tab within your chosen community. Underneath "Create Entry" Button, select the settings icon "Admin View". (2) Next, select the folder icon in the left hand side. This will open up a menu for your folders. (3) Click on the 3 dots next to Main folder and click "Add subfolder" then add a name and click save.
Q: How Do I Add Resources to my Folders ?
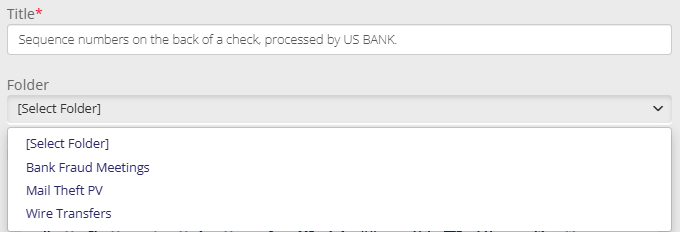
A: To add an existing resource into a folder: Click on the three dots (Additional Actions) next to a resource. Click Edit. Click "Next" in the Uploaded File(s) screen. Select the folder to add this post to in the Folder field below the Title* field. Choose the folder of your choice in the dropdown menu under Folder [Select Folder]. Click "Finish" at the bottom.
To add a new resource post into a folder: Follow the steps to create an entry and when you arrive at the Attachment Description page, select the folder of your choice in the Folder [Select Folder] Dropdown Menu.